Patterns

Square Quilt Pattern

Square Quilt Pattern

I started this baby quilt pattern months ago, but am just finishing the quilt now. I wanted to make something that was easy enough for a beginner, but still modern and creative. Only two fabrics are used for the top of the quilt, and a third print for the back. You'll want to pick high contrast fabrics for your two colors for the quilt top.

The fun thing about making this quilt is that you can place the blocks as I did or get creative with how you layout each square.  The free quilt pattern is below. I have not tested the pattern, so please let me know if you find anything goofy.
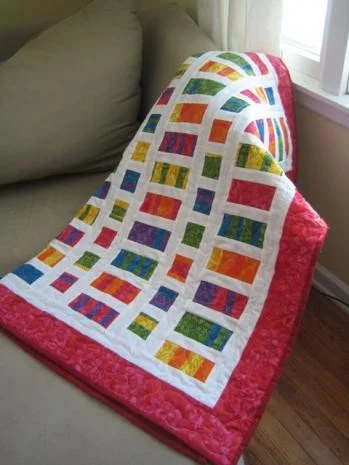
Archipelago Quilt

[img:2]

Finished size

42"x45"

This is larger than a crib size, but smaller than a throw. I like my baby quilt patterns to be this size, so that the blanket is large enough to throw on the floor when they're babies, but small enough for them to drag when they start toddling around.

Supplies

  • Color A (squares): 1/2 yard
  • Color B (background): 1 yard
  • 46" x 48" Batting
  • Backing fabric: 1 1/4th yards
  • Thread and other common quilting notions

Cutting

  • Color A
    • Cut one 4.5" strip and cut it down to eight 4.5" squares
    • Cut five 3.5" strip
      • Cut one down to twelve 3.5" squares
      • Set aside the other four for borders
    • Cut one 2.5" strip and cut it down to ten 2.5" squares
    • Cut one 4.5" strip and cut it down to the following
      • Four 3.5" squares
      • Ten 2.5" squares
      • Sixteen 1.5" squares
  • Color B 
    • Cut five 4.5" strips and then cut them down to the following
      • 32 - 4.5" x 1"
      • 32 - 4.5" x 1.5"
      • 32 - 4.5" x 2"
      • 16 - 4.5" x 4.5'
    • Cut four 1.5" strips and then cut them down to the following
      • 32 - 1.5" x 2"
      • 32 - 1.5" x 2.5"
    • Cut one 3.5" strip and cut it down to the following
      • 32 - 3.5" x 1"
      • 3 - 2.5" squares
    • Cut one 6.5" strip and cut it approximately 14" from the selvage

Piecing

Blocks

All the blocks are assembled the same. Using the pieces listed for each block type, do the following until all blocks are complete.

  • Sew the shorter blocks to the center square
  • Press the seams toward the outside
  • Sew the long side on each side
  • Press toward the outside

Block A - 8 total

These are the 4.5" Color A squares. Done!

Block B - 16 total

  • Center square - 3.5" square
  • Short sides - 3.5" x 1"
  • Long sides - 4.5" x 1"

Block C - 16 total

  • Center square - 2.5" square
  • Short sides - 2.5" x 1.5"
  • Long sides - 4.5" x 1.5"

Block D - 16 total

  • Center square - 1.5" square
  • Short sides - 2" x 1.5"
  • Long sides - 4.5" x 2"

Block E - 16 total

These are the 4.5" Color B squares.

Center Piecing

Sew the blocks together in the following order, press the seams, then sew the rows together from top to bottom.

  1. D | C | B | A | B | C | D | E | E
  2. E | D | C | B | A | B | C | D | E
  3. E | E | D | C | B | A | B | C | D
  4. E | D | C | B | A | B | C | D | E
  5. D | C | B | A | B | C | D | E | E
  6. E | D | C | B | A | B | C | D | E
  7. E | E | D | C | B | A | B | C | D
  8. E | D | C | B | A | B | C | D | E
  9. D | C | B | A | B | C | D | E | E
  10. E | D | C | B | A | B | C | D | E

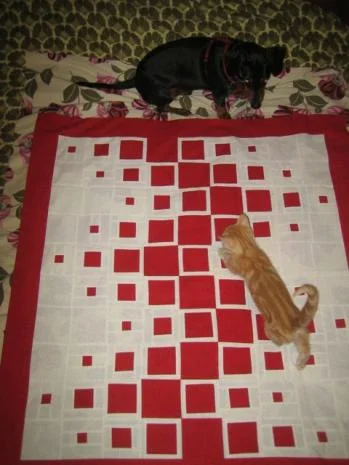
I played with some alternative layouts, if you're interested in trying something else.

[img:3]

[img:4]

[img:5]

Borders

Sew shorter borders on the sides. Press the seams.

Sew the other borders on. Press the seams.

Backing Fabric

I like to piece the backing fabric, both because it looks awesome and it saves you fabric for quilts that are just a little too wide for 42" backing fabric.

Strip insert

  • Sew the remaining seven (four color A, three color B) 2.5" squares into a strip, alternating Color A and B. Press the seams.
  • Sew the 2.5" x 14.5" Color B strips on each side. Press the seams.
  • Sew the two 6.5" wide strips to each end of this piece.

Finish backing

  • About 14" in, cut the backing fabric the long way
  • Sew each piece on either side of the insert
  • Press seams

[img:6]

Back, quilt and bind your new quilt

I stippled in the white and did a design in each block. Be creative

[img:7]

Fat Quarter Baby Quilt Pattern

Fat Quarter Baby Quilt Pattern

I've been working on this quilt off and on for months. I fought the urge to completely scrap it and start over a couple times, and I'm glad I did. Below is how I made it. It's more of guidelines rather than a pattern, so feel free to ask if you have questions.

[img:1]

Finished size

44.5" x 52" - I tend to make baby quilts larger than crib size, since the babies are only crib size for less than two years. I like to give them things they'll be staining for years.

Supplies

Piecing

  • Six fat quarters - I used batiks in red, orange, yellow, green, blue and violet
  • 1 yard sashing fabric (white). You might want to get a little extra, to be safe.
  • 1/3rd yard border fabric (red)
  • Thread and other common quilting notions

Finishing

  • 1/2 yard  - Binding - I used the same fabric as the backing.
  • 1.5 yards 56" fabric - Backing - I used a solid red.
  • 48" x 56" Batting

Cutting

Cut each of the fat quarts into strips that vary between 1" and 2.5" at their thickest and thinnest.

[img:2]

Divide each color into thirds. Sew the strips back together, alternating one third with the color prior in the spectrum, one third with the color after, and one third with itself. Continue to sew them together, pressing the seams open, until you have one long strip of fabric.

[img:3]

  • Cut this reconstructed piece of fabric into 5" strips, cutting the same directions as the seams.
  • Cut each of those strips into pieces that are 2.5"x5"
  • From those, select 22 and cut them in half to make 44 2.5" squares - C1
  • You will need 60 5" x 2.5" blocks. You should have extras. - C2

From the sashing fabric, cut

  • 40 - 1.5" x 2.5" - S1
  • 55 - 1.5" x 5" - S2
  • 8 - 1.75" x 2.5" - S3
  • 10 - 2" x 35.5" - S4
  • 2 - 2" x 46" (if you use standard 42" width fabric, you'll need to piece these) - S5

From border fabric, cut

  • 2 - 3.5" x 38.5"
  • 2 - 3.5" x 40.5"
  • 2 - 3.5" x 12.5"

Piecing

Finishing

Create 4 short rows and 5 tall rows, pressing the seams.

Short row (SR):

S3 - C1 - S1 - C1 - S1 - C1 - S1 - C1 - S1 - C1 - S1 - C1 - S1 - C1 - S1 - C1 - S1 - C1 - S1 - C1 - S1 - C1 - S3

Long row (LR):

C2 - S2 - C2 - S2 - C2 - S2 - C2 - S2 - C2 - S2 - C2 - S2 - C2 - S2 - C2 - S2 - C2 - S2 - C2 - S2 - C2 - S2 - C2


Alternate color rows and sashing as follows. Press seams.

  • S4
  • LR
  • S4
  • SR
  • S4
  • LR
  • S4
  • SR
  • S4
  • LR
  • S4
  • SR
  • S4
  • LR
  • S4
  • SR
  • S4
  • LR
  • S4

Sew the S5 pieces to the side.

[img:4]

Sew short border to the top and bottom. Press seams. Sew remaining border pieces to the left and right. Press seams.

Quilt and bind.

[img:5]

Snow Day Sock Pattern

As it gets colder, I'm discovering that normal socks are no match for the coldness of my hardwood floors. Not being much of a slipper person, I made these worsted weight socks. They are too thick to wear with shoes, but they are perfect for keeping my toes warm around the house.

These socks are knit toe up with a short row heel using the magic loop method. They are a very fast knit - I'm a slow knitter and completed them in less than a week. The pattern includes charted and written instructions.

[img:1]

Thanks to karinamaza, moilulu and LiveIIKnit on Ravelry for helping test.

Size

Adult women's

Gauge

2"x2" in stockinette st = 9.5 sts x 12 rows - it is not necessary to get row gauge.

Materials

  • US size 5 (3.75 mm) 40" circular needles
  • 90 gr Cascade 220 worsted
  • Cable needle
  • Tapestry needle

Notes

  • W&T - Wrap and turn - slip the stitch to the right needle, bring yarn to front, slip stitch to left needle.
  • CF - Cable front - Slip 3 sts to cable needle, hold to front, k3, k3 from cable needle
  • CB - Cable back - Slip 3 sts to cable needle, hold to back, k3, k3 from cable needle
  • YO - yarn over
  • SSK - Slip slip knit
  • K2tog - Knit two sts together

[img:2]

[img:3]

Chart

  • Row 1 - P5 k6 p1 k6 p5
  • Row 2 - P5 k6 p1 k6 p5
  • Row 3 - P5 CB p1 CF p5
  • Row 4 - P5 k6 p1 k6 p5
  • Row 5 - P4 k2tog k5 YO p1 YO k5 SSK p4
  • Row 6 - P4 k7 p1 k7 p4
  • Row 7 - P3 k2tog k6 YO p1 YO k6 SSK p3
  • Row 8 - P3 k8 p1 k8 p3
  • Row 9 - P2 k2tog k7 YO p1 YO k7 SSK p2
  • Row 10 - P2 k9 p1 k9 p2
  • Row 11 - P1 k2tog k8 YO p1 YO k8 SSK p1
  • Row 12 - P1 k10 p1 k10 p1

[img:4]

Toe

Create a slip knot. Cast on 24 sts in addition to the slip knot (12 on needle, 12 on cable) using Figure 8 cast on.
Knit even one round. Do not knit the slip stitch. When you come to it, just drop it off and pull the slip knot out.

  • Increase row: K1, m1, k until one st remains on needle, m1, k1. Repeat on other needle.
  • Even row: K all stitches.

Alternate increase row and even row until you have 44 sts total, 22 on each needle.

  • First needle - K21, m1, k1 (23 sts)
  • Second needle - K1, m1, k until one st remains on needle, m1, k1. (24 sts; 47 stitches total)
  •  

K one round.

    Foot

    Work chart on first needle, k second needle.

    Continue until sock measures 2.5" less than the length of the foot (approximately 3 repeats), stopping at the beginning of needle 2. Remember to note the last row worked.

    Final row of chart worked: _____

    Heel

    The heel is a short row heel worked across the 24 stitches on the second needle.

    • Row 1 – Knit to last stitch. W&T
    • Row 2 - Purl to last stitch. W&T
    • Row 3 – K to one stitch before the wrapped stitch. W&T
    • Row 4 - P to one stitch before the wrapped stitch. W&T

    Repeat rows three and four 5 more times. There will be 7 wrapped stitches on each end.
    Now we need to pick up the wrapped stitches.

    • Row 1 – K to the first wrapped stitch. Pick up the wrap around the stitch, place it on the left needle, and knit the wrap and the stitch together. Turn. Twisting the wrap will keep it tight and neat.
    • Row 2 – P to the first wrapped stitch. Pick up the wrap around the stitch, place it on the left needle, and knit the wrap and the stitch together. Turn.

    Repeat until all the wrapped stitches have been worked.

    Leg

    • Needle 1 - Continue working chart from the row you noted above
    • Needle 2 - P1 [k2 p2] 5 times, k2 p1

    Continue working chart on needle 1 and ribbing on needle 2 until there are six repeats of the chart.

    Ribbing

    • Needle 1 - P1 [k2 p2 k2 p2 k2 p1] 2 times
    • Needle 2 - P1 [k2 p2] 5 times, k2 p1

    Repeat until ribbing measures one inch.

    Loosely cast-off and weave in ends.

    [img:5]

    Knit Monster Baby Booties

    Note 2/6/11: I've created a new version of this design with improved construction and more sizes (this version runs small). Find the improved monster booties pattern here.

    The crochet version of these booties were such a hit that I wrote a pattern for knitting. These booties will fit 0-3 months on a small baby. They are pretty small, so you might want to use larger needles than I did.

    Monster Baby Booty Pattern

    [img:1]

    Knitted version

    These booties are really quick and easy to crochet. I made this out of yarn in the stash. They don't take much yarn. You could also make them out of green or other great monster colors.

    These booties will fit 0-3 months on a small baby. They are pretty small, so you might want to use larger hook than I did.

    View on Ravelry