Free

Lotus Baby Blanket Pattern

Lotus Baby Blanket Pattern

I need to get rid of yarn. 

A lot of it is left overs from other projects - too much to toss, too little to make anything - or stuff that has been given to me. Nice and thank you, but not what I'd have bought. Also, yarn follows the same rules as Chinese food - left overs are either consumed in the first two days, or you lose the ability to see them. The get pushed further and further to the back, until in a flurry of Spring cleaning you come across a container you're afraid to open.

It's making me crazy. I feel guilty buying new stuff I'd actually use because I have approximately 8 sheep in my closet. And it just sits there. Staring.

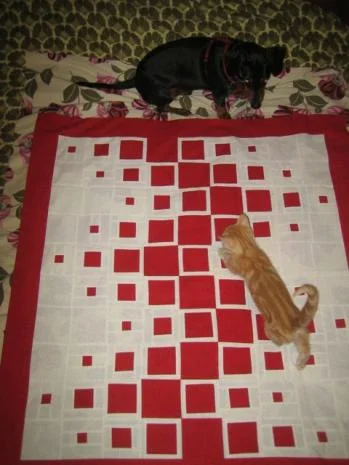
So I made a blanket to cover my shame.

[img:1]

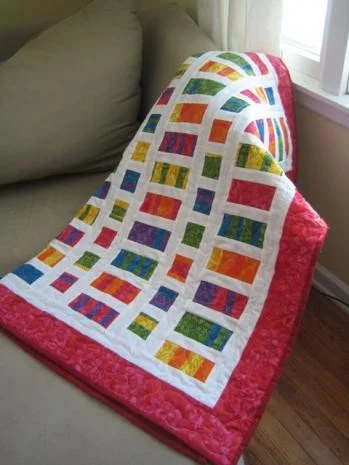
This yarn was a lovely cotton/alpaca blend that someone cruely dyed the color of blanched salmon. I believe my mother had a sweater in exactly this color somewhere around 1993. I used it to make a baby blanket. Being pre-verbal, babies' opinions on color pallet are easily ignored. But to appease their now-talking parents, I plan to dye it 'flamingo'.

[img:2]

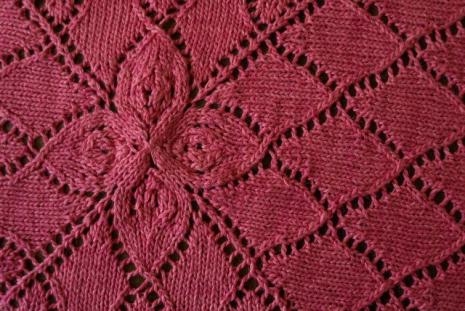
This blanket is a pretty quick knit. All the confusing stuff is right at the beginning, so starting over/frogging (not that anyone ever does...) isn't too painful. The petal pattern is easily memorized and doesn't take much concentration after you figure it out. This probably isn't the best pattern for your first lace project, it would make a great second one. 

Lotus Knit Baby Blanket Pattern

Size

32"x32"

Gauge

18 sts x 20 rows = 4 inches in stockinette

Materials

  • 300 grams (3 skeins) Cascasde 220 wool or similar worsted weight yarn (100 grams, 220 yards) 
  • Size 8 (5 mm) 32” circular needles
  • Size 8 (5mm) 60" circular needles
  • Darning needle

Abbreviations

  • K – Knit
  • P – Purl
  • K2tog – knit 2 together
  • Ssk – Slip 2 stitches knitwise and k2tog
  • Sl, k2tog, psso – Slip on st to the right needle, k2tog, pass slip stitch over
  • K1f&b - Knit 1 in the front and back of the stitch
  • K tbl - Knit through back loop
  • YO - Yarn over
  • PM - Place marker

Notes

Throughout pattern, slip markers as you come to them.

Switch to longer circulars when needed.

This blanket is knit using the magic loop method.

Directions

Cast on 8 sts using the disappearing loop method. Pull the cable through so you have 4 sts on each needle.

Center Flower

Work the following pattern four times on each round.Place a marker between each repeat.

  1. K, 2yo, k
  2. K2, p, k
  3. K2, yo, k2
  4. K2, k1f&b, k2
  5. K2, yo, k2, yo, k2
  6. Knit
  7. K2, yo, k4, yo, k2
  8. K3, k2tog, ssk, k3 
  9. Yo, k2, yo, k2, yo, k2, yo, k2
  10. K3, k2tog, k1, k1f&b, k1, ssk, k2
  11. K tbl, yo, k2, yo, k1, yo, k2tog, ssk, yo, k1, yo, k2, yo
  12. K4, yo, k2tog, k2tog, yo, ssk, ssk, yo, k3
  13. K tbl, yo, k1, yo, k3, yo, k2, k1f&b, k2, yo, k3, yo, k1, yo
  14. K8, yo, ssk, ssk, k2tog, k2tog, yo, k5
  15. K tbl, yo, k3, yo, k1, ssk, k1, sl1, k3tog, psso, k1, k2tog, k1, yo, k3, yo
  16. Knit
  17. K tbl, yo, ssk, k1, k2tog, yo, k7, yo, ssk, k1, k2tog, yo
  18. Knit
  19. K tbl, yo, k5, yo, ssk, k3, k2tog, yo, k5, yo
  20. Knit
  21. K tbl, yo, k7, yo, ssk, k1, k2tog, yo, k7, yo
  22. Knit
  23. K tbl, yo, k9, yo, sl1, k2tog, psso, yo, k9, yo
  24. Knit
  25. K tbl, yo, k11, yo, ssk, k10, yo
  26. Knit


Petals

Work the following pattern between each marker.

  1. Ktbl, *yo, k tbl, yo, ssk, k7, k2tog* Repeat from * to * until 1 st before marker, yo, k tbl, yo, slip marker.
  2. Knit
  3. Ktbl, *yo, k3, yo, ssk, k5, k2tog* Repeat from * to * until 3 sts before marker, yo, k3, yo, slip marker.
  4. Knit
  5. Ktbl, *yo, ssk, k1, k2tog, yo, k7* Repeat from * to * until 5 sts before marker, yo, ssk, k1, k2tog, yo, slip marker.
  6. Knit
  7. Ktbl, *yo, k5, yo, ssk, k3, k2tog* Repeat from * to * until 5 sts before marker, yo, k5, yo, slip marker.
  8. Knit
  9. Ktbl, *yo, k7, yo, ssk, k1, k2tog* Repeat from * to * until 7 sts before marker, yo, k7, yo, slip marker.
  10. Knit 
  11. Ktbl, *yo, k9, yo, sl1, k2tog, psso* Repeat from * to * until 9 sts before marker, yo, k9, yo, slip marker.
  12. Knit 
  13. Ktbl, yo, k11, *yo, ssk, k10* Repeat from * to * until marker, yo, slip marker.
  14. Knit 

Repeat the petals pattern 4 more times, for a total of 5 repeats.

Outer Edge

  • Increase round: Ktbl, yo, k until marker, yo, slip marker.
  • Even round: Knit

Alternate increase and even round for ten total rounds. Work 5 additional rounds in seed stitch.

  • Seed stitch increase: Ktbl, yo, *k, p* repeat from * to * until marker, yo, slip marker.
  • Seed stitch even round: P, k around.

Cast off loosely in pattern.

[Img:3]

Edited 3/16/2011 - Fixed error in line 7 and 13 of flower pattern.
Edited 3/17/2011 - Couple more.
Edited 3/20 - Dyed.
Edited 3/27 - Couple tweaks
Edited 3/31 - Row 15 will be the death of me.

[img:4]

Men's Cabled Hat Pattern

Men's Cabled Hat Pattern

With how brutally cold it's been, it's depressing to think we are just a month into winter. It seems like Kansasians have given into the permanence of the cold. Random comments about how 'nice' it is outside can be overheard when the thermometer inches above the 20 degree mark.  It's possible the lack of sun has made us delirious.

Needless to say, it is time for heavy duty knit ware. Lace and silk are nice and all, but these balmy 5 degree days demand wool and cables. Designed the below for the fella. I wanted a guy-friendly design that wasn't just ribbing and a rolled up cuff so he can double up on his ears. I really love the outcome, and it was a really fast knit (2 days of fairly regular knitting).

[img:1]

Men's Cabled Hat Pattern

Size

Adult Women's/Men's

Gauge

18 sts = 4 inches in stockinette

Materials

  • One skein (4 oz, 190 yards) Lamb's Pride Worsted weight. 85% wool, 15% mohair
  • Size 8 (5 mm) 32” circular needles for magic loop method or DPNs, depending upon preference
  • Cable Needle
  • Darning needle

Abbreviations

K – Knit

P – Purl

K2tog – knit 2 together

Ssk – Slip 2 stitches knitwise and k2tog

Sl, k2tog, psso – Slip on st to the right needle, k2tog, pass slip stitch over

CL – Cable Left – Slip 3 sts to cable needle, hold to front, k3 from left needle, k3 from cable needle

CR – Cable Right – Slip 3 sts to cable needle, hold to back, k3 from left needle, k3 from cable needle

Directions

Cable cast on 80 (90) sts

Ribbing

*P2 (3), k3, p2 (3), k3, p3, k3* Repeat from * to * around until ribbing measures 2.5 (3) inches.

Body of Hat

Work the following pattern three times

  • Work 6 (7) rows of *P2 (3), k3, p2 (3), k9* Repeat from * to * to end of round.

  • *P2 (3), k3, p2 (3), CR, k3* Repeat from * to * to end of round.

  • Work 6 (7) rows of *P2 (3), k3, p2 (3), k9* Repeat from * to * to end of round.

  • *P2 (3), k3, p2 (3), k3, CL* Repeat from * to * to end of round.

Men's only. Work the final round of the last repeat as:

  • *P2, ssk, k1, k2tog, p2, k3, CL* Repeat from * to * to end of round.

[img:2]

Crown

*P2, k3, p2, ssk, k5, k2tog* Repeat from * to * to end of round.

*P2, k3, p2, k7* Repeat from * to * to end of round.

*P2, k3, p2, ssk, k3, k2tog* Repeat from * to * to end of round.

*P2, k3, p2, k5* Repeat from * to * to end of round.

*P1, ssk, k1, k2tog, p1, k5* Repeat from * to * to end of round.

*P1, k3, p1, k5* Repeat from * to * to end of round.

*P1, k3, p1, ssk, k1, k2tog* Repeat from * to * to end of round.

*P1, k3* Repeat from * to * to end of round.

*P1, k3, p1, sl1, k2tog, psso* Repeat from * to * to end of round.

*P1, k3, p1, k1* Repeat from * to * to end of round.

*P1, sl1, k2tog, psso, p1, k1* Repeat from * to * to end of round.

*P1, k1* Repeat from * to * to end of round.

Ssk around.

Cut yarn and pull end through remaining sts.

Weave in ends.

[img:3]


Edited 1/24/11 to correct ribbing and final round before crown.
Edited 3/28/11 to change k3 to k1 on 7th round of crown.
Edited 4/11 to add note about magic loop

Scrap Quilt Pattern

In economics, externalities are the unintended side effects of industry. Similarly, this quilt is the side effect of many of the other quilts I've made. I always buy more fabric than I think I'll need, so I thought it was time to turn the left overs into some thing more awesome.

This quilt is a good way to use up scraps. Each color strip uses only a 3" strip of the width of the fabric. It's a quick and easy quilt, but still interesting.

If you're interested in making other sizes, it should be simple to scale up. If you'd like help, let me know. I'm happy to do it, if there is interest.

[img:1]

Externality Quilt

Finished size

36"x48" - a bit smaller than crib size

Supplies

  • Eight sets of twelve 3" blocks
  • 2/3rd white (or contrast) fabric, cut into eight 3" x width of fabric strips
  • 56" x 80" Batting - I doubled the batting to make the quilt extra fluffy. A precut twin size piece is large enough.
  • Backing fabric - 1 1/3rd yards
  • 1/3rd yard for binding
  • Yarn for tieing
  • Thread and other common quilting notions

Top of the Quilt

For each two row set of one color, you will need one strip that is 3" by the width of the fabric. Since this quilt is meant to use scraps, you might not have strips that are the full width of the fabric. This is no big deal, it will just require more cutting.

  • If you have a 3" x width of fabric strip, grab one of the strips of white. Sew the two strips together along the long edge. Press seam toward the color. Cut this down to twelve 3" x 5.5" pieces.
  • If you do not, cut twelve 3" blocks from the scraps that you do have. From the white, cut down a strip to 3" blocks. Sew one color block to one white block. Press seam toward the color

Continue until you have ninety-six 3" x 5.5" blocks with color on one side, white on the other. For each color, chain together six of these blocks. Press the seams toward the color. You now have sixteen strips of twelve squares (alternating color and white) which can be paired by color.

For each color pair, prepare to sew them together so that the color and white alternate. Take the time to pin and line up the seams. How well your seems line up can make or break this quilt.

[img:2]

One you have sewn together the pairs of strips, lay the strips out to determine what order you would like the colors to appear in. Pin and sew together the strips until the top is together. Press the seams open.

[img:3]

Finishing

I wanted the quilt to be extra fluffy, so I doubled up the batting. Tie in the middle of the white blocks.

Bind your new quilt

[img:4]

Square Quilt Pattern

Square Quilt Pattern

I started this baby quilt pattern months ago, but am just finishing the quilt now. I wanted to make something that was easy enough for a beginner, but still modern and creative. Only two fabrics are used for the top of the quilt, and a third print for the back. You'll want to pick high contrast fabrics for your two colors for the quilt top.

The fun thing about making this quilt is that you can place the blocks as I did or get creative with how you layout each square.  The free quilt pattern is below. I have not tested the pattern, so please let me know if you find anything goofy.

Archipelago Quilt

[img:2]

Finished size

42"x45"

This is larger than a crib size, but smaller than a throw. I like my baby quilt patterns to be this size, so that the blanket is large enough to throw on the floor when they're babies, but small enough for them to drag when they start toddling around.

Supplies

  • Color A (squares): 1/2 yard
  • Color B (background): 1 yard
  • 46" x 48" Batting
  • Backing fabric: 1 1/4th yards
  • Thread and other common quilting notions

Cutting

  • Color A
    • Cut one 4.5" strip and cut it down to eight 4.5" squares
    • Cut five 3.5" strip
      • Cut one down to twelve 3.5" squares
      • Set aside the other four for borders
    • Cut one 2.5" strip and cut it down to ten 2.5" squares
    • Cut one 4.5" strip and cut it down to the following
      • Four 3.5" squares
      • Ten 2.5" squares
      • Sixteen 1.5" squares
  • Color B 
    • Cut five 4.5" strips and then cut them down to the following
      • 32 - 4.5" x 1"
      • 32 - 4.5" x 1.5"
      • 32 - 4.5" x 2"
      • 16 - 4.5" x 4.5'
    • Cut four 1.5" strips and then cut them down to the following
      • 32 - 1.5" x 2"
      • 32 - 1.5" x 2.5"
    • Cut one 3.5" strip and cut it down to the following
      • 32 - 3.5" x 1"
      • 3 - 2.5" squares
    • Cut one 6.5" strip and cut it approximately 14" from the selvage

Piecing

Blocks

All the blocks are assembled the same. Using the pieces listed for each block type, do the following until all blocks are complete.

  • Sew the shorter blocks to the center square
  • Press the seams toward the outside
  • Sew the long side on each side
  • Press toward the outside

Block A - 8 total

These are the 4.5" Color A squares. Done!

Block B - 16 total

  • Center square - 3.5" square
  • Short sides - 3.5" x 1"
  • Long sides - 4.5" x 1"

Block C - 16 total

  • Center square - 2.5" square
  • Short sides - 2.5" x 1.5"
  • Long sides - 4.5" x 1.5"

Block D - 16 total

  • Center square - 1.5" square
  • Short sides - 2" x 1.5"
  • Long sides - 4.5" x 2"

Block E - 16 total

These are the 4.5" Color B squares.

Center Piecing

Sew the blocks together in the following order, press the seams, then sew the rows together from top to bottom.

  1. D | C | B | A | B | C | D | E | E
  2. E | D | C | B | A | B | C | D | E
  3. E | E | D | C | B | A | B | C | D
  4. E | D | C | B | A | B | C | D | E
  5. D | C | B | A | B | C | D | E | E
  6. E | D | C | B | A | B | C | D | E
  7. E | E | D | C | B | A | B | C | D
  8. E | D | C | B | A | B | C | D | E
  9. D | C | B | A | B | C | D | E | E
  10. E | D | C | B | A | B | C | D | E

I played with some alternative layouts, if you're interested in trying something else.

[img:3]

[img:4]

[img:5]

Borders

Sew shorter borders on the sides. Press the seams.

Sew the other borders on. Press the seams.

Backing Fabric

I like to piece the backing fabric, both because it looks awesome and it saves you fabric for quilts that are just a little too wide for 42" backing fabric.

Strip insert

  • Sew the remaining seven (four color A, three color B) 2.5" squares into a strip, alternating Color A and B. Press the seams.
  • Sew the 2.5" x 14.5" Color B strips on each side. Press the seams.
  • Sew the two 6.5" wide strips to each end of this piece.

Finish backing

  • About 14" in, cut the backing fabric the long way
  • Sew each piece on either side of the insert
  • Press seams

[img:6]

Back, quilt and bind your new quilt

I stippled in the white and did a design in each block. Be creative

[img:7]

Fat Quarter Baby Quilt Pattern

Fat Quarter Baby Quilt Pattern

I've been working on this quilt off and on for months. I fought the urge to completely scrap it and start over a couple times, and I'm glad I did. Below is how I made it. It's more of guidelines rather than a pattern, so feel free to ask if you have questions.

[img:1]

Finished size

44.5" x 52" - I tend to make baby quilts larger than crib size, since the babies are only crib size for less than two years. I like to give them things they'll be staining for years.

Supplies

Piecing

  • Six fat quarters - I used batiks in red, orange, yellow, green, blue and violet
  • 1 yard sashing fabric (white). You might want to get a little extra, to be safe.
  • 1/3rd yard border fabric (red)
  • Thread and other common quilting notions

Finishing

  • 1/2 yard  - Binding - I used the same fabric as the backing.
  • 1.5 yards 56" fabric - Backing - I used a solid red.
  • 48" x 56" Batting

Cutting

Cut each of the fat quarts into strips that vary between 1" and 2.5" at their thickest and thinnest.

[img:2]

Divide each color into thirds. Sew the strips back together, alternating one third with the color prior in the spectrum, one third with the color after, and one third with itself. Continue to sew them together, pressing the seams open, until you have one long strip of fabric.

[img:3]

  • Cut this reconstructed piece of fabric into 5" strips, cutting the same directions as the seams.
  • Cut each of those strips into pieces that are 2.5"x5"
  • From those, select 22 and cut them in half to make 44 2.5" squares - C1
  • You will need 60 5" x 2.5" blocks. You should have extras. - C2

From the sashing fabric, cut

  • 40 - 1.5" x 2.5" - S1
  • 55 - 1.5" x 5" - S2
  • 8 - 1.75" x 2.5" - S3
  • 10 - 2" x 35.5" - S4
  • 2 - 2" x 46" (if you use standard 42" width fabric, you'll need to piece these) - S5

From border fabric, cut

  • 2 - 3.5" x 38.5"
  • 2 - 3.5" x 40.5"
  • 2 - 3.5" x 12.5"

Piecing

Finishing

Create 4 short rows and 5 tall rows, pressing the seams.

Short row (SR):

S3 - C1 - S1 - C1 - S1 - C1 - S1 - C1 - S1 - C1 - S1 - C1 - S1 - C1 - S1 - C1 - S1 - C1 - S1 - C1 - S1 - C1 - S3

Long row (LR):

C2 - S2 - C2 - S2 - C2 - S2 - C2 - S2 - C2 - S2 - C2 - S2 - C2 - S2 - C2 - S2 - C2 - S2 - C2 - S2 - C2 - S2 - C2


Alternate color rows and sashing as follows. Press seams.

  • S4
  • LR
  • S4
  • SR
  • S4
  • LR
  • S4
  • SR
  • S4
  • LR
  • S4
  • SR
  • S4
  • LR
  • S4
  • SR
  • S4
  • LR
  • S4

Sew the S5 pieces to the side.

[img:4]

Sew short border to the top and bottom. Press seams. Sew remaining border pieces to the left and right. Press seams.

Quilt and bind.

[img:5]